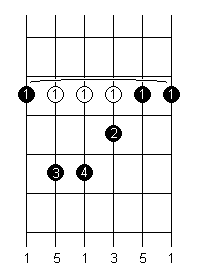
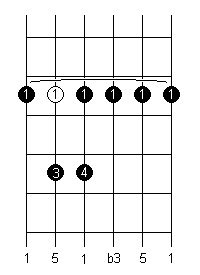
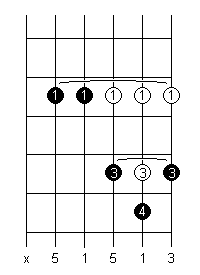
Below are some useful chord shapes for major and minor chords. They are broken into 3 sets, based generally on which string the root note is played on, with variations on each shape provided where applicable.
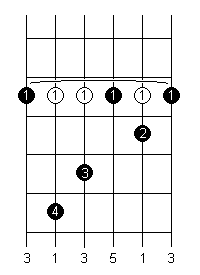
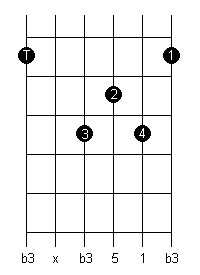
The chord tones are marked at the bottom of each diagram, with the fingers to be used denoted by numbers within the dots on the diagram. Note that some shapes require the thumb (marked as a 'T') to be looped over the edge of the neck to fret a note on the 6th string.
Also keep an eye out for strings where no note is played at all (marked as a 'x' below the diagram). You can try to mute these unplayed strings by damping the string with a finger on the string next to it (e.g. reaching over the string being played). By muting the unplayed strings the whole chord can be strummed if you want, without hitting any outside notes.
All of these are moveable - the chord being played will depend on where the root note of the chord is played.
Nothing too complicated here at all, although the first finger barre across all six strings can take a while to get the hang of.
| Major | Minor |
|---|---|
 |
 |
Again, reasonably straight-forward, but watch for the bass note fretted by the thumb in the minor chord along with the odd unplayed string.
| Major | Minor |
|---|---|
 |
 |
 |
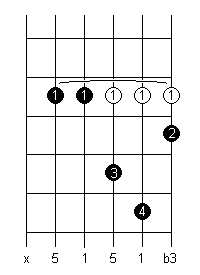 |
You need a barre with the third finger as well as the first for that major chord. Don't be tempted to try and use your second, third and fourth fingers on individual strings instead of the barre. The barre method leaves your other fingers free for playing other notes- very useful for alternating between a major chord and a suspended 4th chord (see elsewhere for an explanation of suspended chords)
| Major | Minor |
|---|---|
 |
 |
These chords shapes are worth getting to grips with, so take the time to learn them. Along with the standard open position chords (more about these in a future tutuorial) yhey will form the basis of your chord vocabulary. Also, because the shapes are moveable, they are very flexible to use.
Experiment with writing and/or arranging chord progressions using these shapes (and remember to employ voice leading to keep things sounding smooth). Good luck.
How useful did you find this tutorial?